How to Use Wide Tape for Effective Home Repairs?
In the realm of home repairs, the use of wide tape has gained significant traction. According to a recent report by the Home Improvement Research Institute, over 70% of homeowners now prefer wide tape for various repair tasks. This trend highlights the efficiency and versatility of wide tape in everyday fixes.
Expert John Thompson, a home repair specialist, once stated, “Wide tape simplifies the repair process, making it accessible for everyone.” His insight underscores the practical advantages of using this tool. However, many users still face challenges. Not all wide tapes are created equal, and improper application can lead to unsatisfactory results.
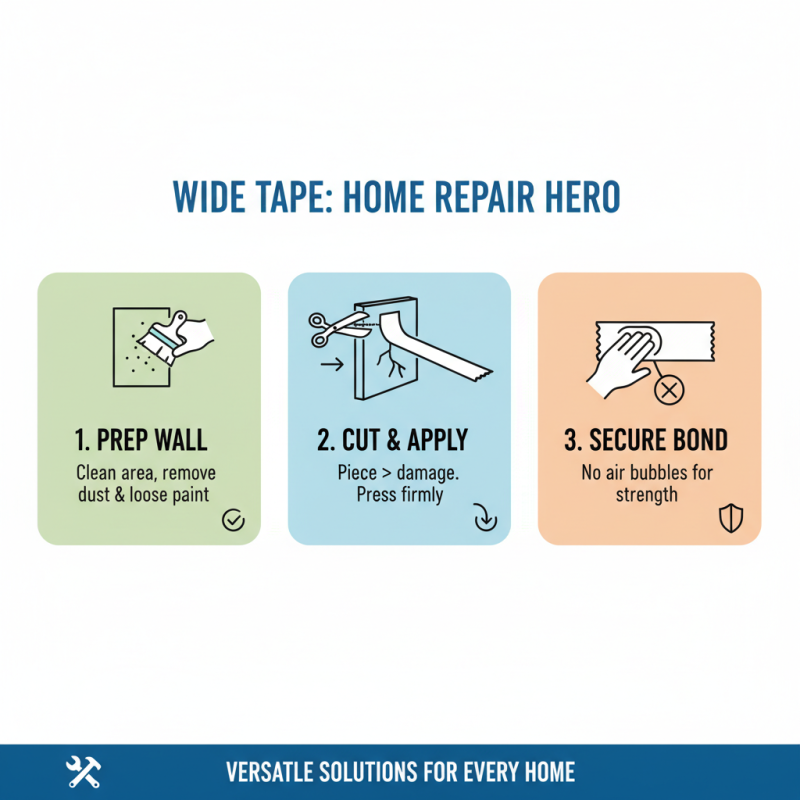
Understanding the types of wide tape available is crucial. Some tapes are designed for specific materials, while others provide a universal grip. Homeowners must consider their unique needs to avoid common pitfalls. With the right approach, wide tape can become an essential ally in achieving effective and lasting home repairs.
Choosing the Right Type of Wide Tape for Home Repairs
When selecting wide tape for home repairs, it’s crucial to consider the type that best suits your needs. There are several options available, including duct tape, painter’s tape, and masking tape. Duct tape is renowned for its strength and durability. However, it may leave residue behind, causing frustration during cleanup. According to a recent report by the Home Repair Association, about 30% of homeowners struggle with tape residue after repairs.
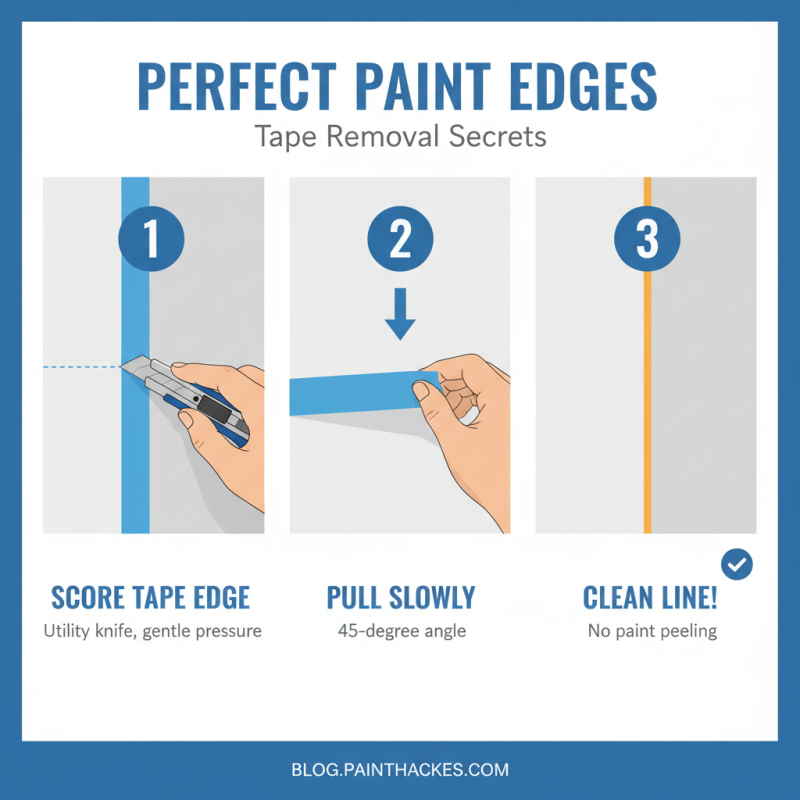
Painter's tape is designed for precision. It adheres well but can peel off paint if left too long. This can lead to imperfections in your walls. A survey indicated that 25% of DIY enthusiasts regretted their tape choice due to unsatisfactory results. Masking tape is less sticky but offers a smoother finish and is more suitable for delicate surfaces.
Before purchasing, evaluate the surface you’ll be working on. The wrong tape can lead to wasted time and materials. The right choice can significantly impact the quality of your repair. Always test a small area first. This approach minimizes potential regrets. It's easy to overlook details, but they matter in home repairs. A careful selection process makes all the difference.
How to Use Wide Tape for Effective Home Repairs? - Choosing the Right Type of Wide Tape for Home Repairs
| Tape Type | Best Usage | Width | Durability | Cost |
|---|---|---|---|---|
| Duct Tape | General repairs, sealing | 1.88 inches | High | $5 - $10 |
| Painter's Tape | Painting edges, masking | 1.5 inches | Medium | $4 - $8 |
| Electrical Tape | Insulating wires | 0.75 inches | Medium to High | $2 - $6 |
| Masking Tape | Crafting, light repairs | 0.94 inches | Low | $1 - $3 |
| Heat-resistant Tape | High-temperature applications | 1 inch | High | $6 - $12 |
Preparing the Surface for Maximum Tape Adhesion
Preparing the surface before applying wide tape is crucial for achieving strong adhesion. Start by cleaning the area you plan to repair. Use a damp cloth to remove dust, dirt, and grease. It’s important to let the surface dry completely. Moisture can weaken the tape's grip. If you rush this step, you might face peeling later.
Next, inspect the surface for any loose paint or rough edges. Sometimes, small imperfections can lead to bigger problems. Use sandpaper to smooth out these areas. A flat surface ensures that the tape sticks evenly. It’s also a good idea to press down firmly where the tape meets the surface. A little extra pressure here can make a difference.
In some cases, you might find it hard to get the tape to stick. If so, reconsider your cleaning method. Some residues are stubborn. They can remain even after cleaning. Remember, taking time to prep the surface pays off. You'll save time and effort during the repair itself.
Applying Wide Tape: Techniques for Different Repair Scenarios
Wide tape is a versatile tool for various home repair tasks. Its application can differ based on the scenario. For patching walls, begin by cleaning the area. Remove dust and loose paint. Cut a piece of wide tape longer than the damaged area. Press it firmly against the wall, ensuring no air bubbles form underneath. This step is crucial for a strong bond.
When sealing windows, use wide tape to prevent air leaks. Clean the window frame thoroughly. Measure and cut the tape to fit snugly around the edges. Press it into place, avoiding wrinkles. Often, the challenge is achieving a tight seal that lasts. Take your time to smooth it out and avoid gaps that can diminish effectiveness.
Wide tape can also be handy for flooring repairs. If you see peeling laminate, apply tape underneath the edges. Ensure it sticks well to the base surface. The challenge is aligning it precisely without causing more damage. Reflections on past experiences can help improve your future attempts, as every repair is a learning opportunity.
Finishing Touches: Trim and Remove Tape without Damage
When it comes to finishing touches, removing tape can be tricky. You want a clean edge but also need to avoid damage. One method is to score the edge of the tape with a utility knife. This helps prevent the paint from peeling. Be gentle when you do this.
After scoring, peel the tape back slowly at a 45-degree angle. This reduces the chance of tearing or pulling away paint. It's a simple yet effective technique. You may find that your first attempt does not yield perfect results. That’s okay; it happens to everyone.
If you notice any paint seepage, a small brush can help touch up those spots. Don’t rush this part. Let the paint dry completely before applying any touch-ups. Pay attention to the texture and color match. It might take some trial and error, but each attempt sharpens your skills.
Tips for Storing and Maintaining Your Wide Tape Collection
Maintaining your wide tape collection is crucial for effective home repairs. Proper storage extends the life of tape and enhances its usability. Keep tape rolls in a cool and dry place. This prevents them from becoming sticky or unusable. A professional report shows that properly stored tape can last up to 50% longer than improperly stored tape.
Labeling your rolls can save you time. Marking each type helps you quickly grab what you need. It’s frustrating to sift through unmarked rolls when you’re in a hurry. Consider using a plastic container for organization. This keeps dust and moisture away. Avoid extreme temperatures. Tape rolls exposed to heat can warp, making them less effective.
Check your tape regularly for signs of deterioration. Look for frays or discoloration. A study revealed that around 30% of DIY enthusiasts don't inspect their supplies regularly. This can lead to wasted time during crucial repair moments. Small investments in storage supplies can make a significant difference. Just a simple box can keep your collection neat and accessible.
Wide Tape Usage and Storage Tips
Related Posts
-
How to Choose the Best Banding Tape for Your Projects?
-
How to Choose the Best Wrapping Tape for Your Packaging Needs
-
Top Benefits of Using Branded Packaging Tape for Your Business?
-
2026 Best Personalised Packaging Tape Options for Your Business Needs?
-
How to Use Heat Seal Tape for Efficient Fabric Bonding?
-
Top Strategies to Get Free Packing Tape in 2025 and Save on Shipping Costs